With over 12 years of lino printing experience, this beginner-friendly guide takes you step by step, from selecting tools and setting up a safe workspace to carving, inking, troubleshooting and finally pulling your first crisp lino print, so you can avoid common pitfalls and transform plain linoleum blocks into striking artwork at home.
What is Lino Printing?
Lino printing is viewed as a traditional relief printmaking method, lino print is also known as linocut. When lino printing you cut a design into a block of linoleum, then ink the remaining raised surface with a brayer and print onto either paper or fabrics using a baren. You can print multiple copies of the same artwork, which are know as editions.
Lino printing is one method of relief printmaking, with similar processes to traditional woodblock printing. Linoleum is a preferred material when compared to wood due to its ease of use when carving.
Some linocut techniques are quite simple such as printing 1 colour lino prints, but can also include reduction printing when creating multi colour prints or using registration methods when multi block lino printing. In this guide we cover the 1 colour linocut technique. We will be using a baren or wooden spoon to lino print with and not a lino printing press, as a lino printing press is very expensive!
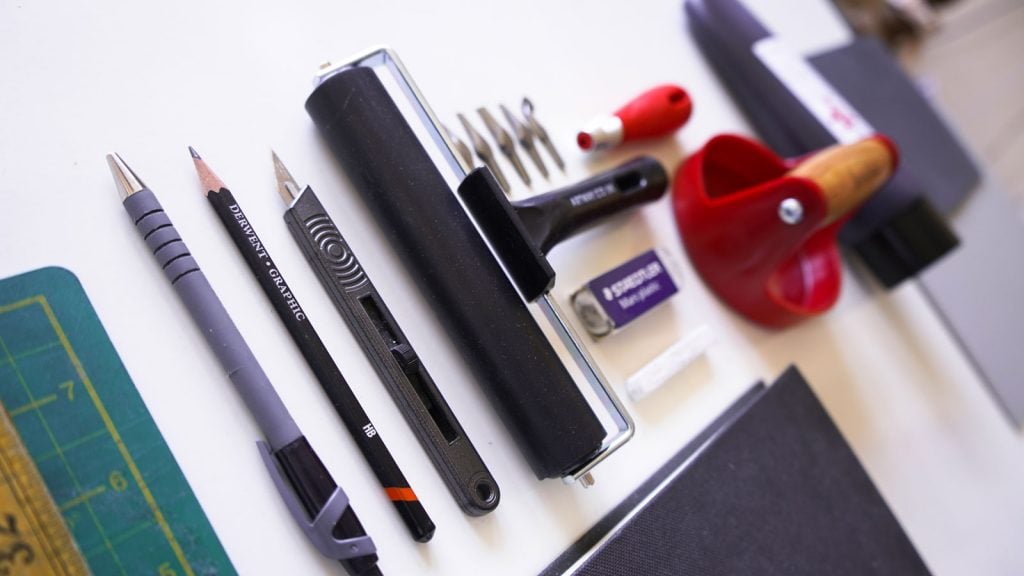
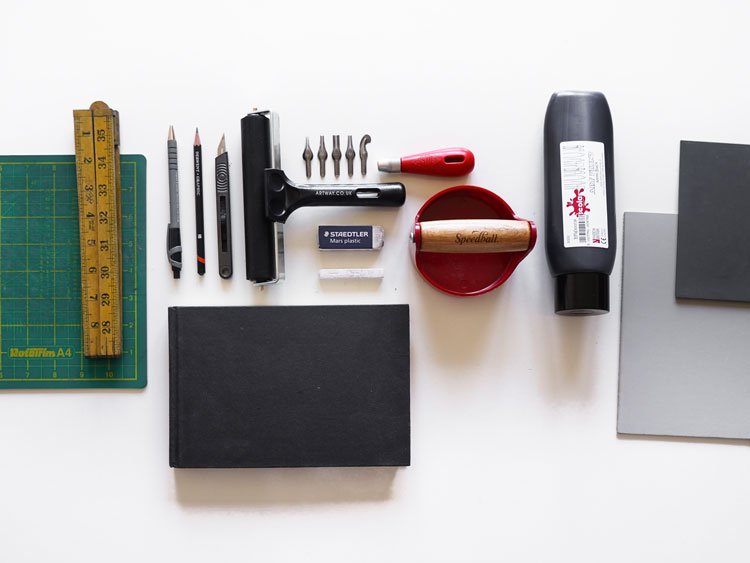
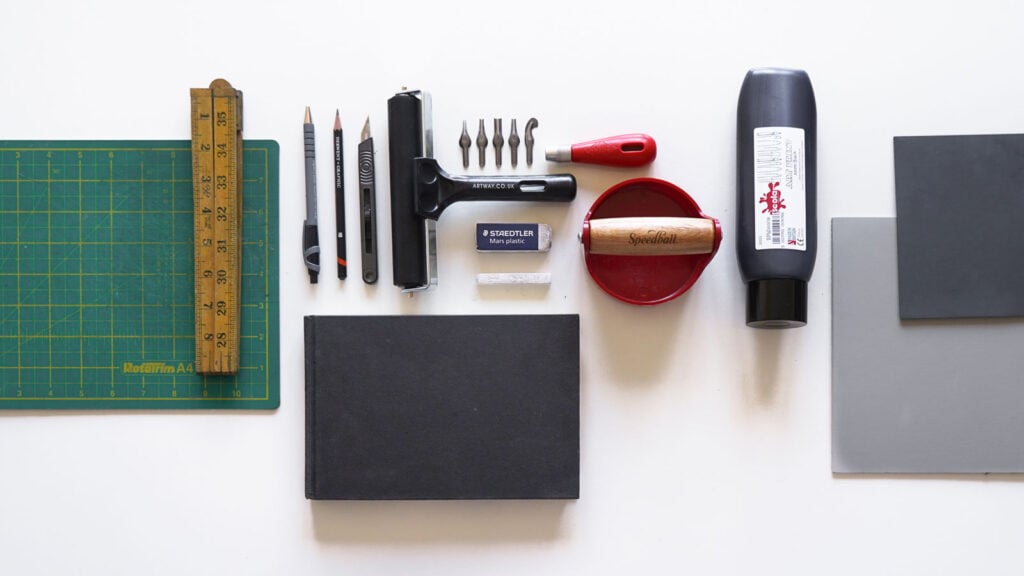
Below, we’ve compiled a list of essential tools to get you started with lino printing. From carving tools to rollers, these pieces of lino printing equipment will help you achieve sharp lines, vibrant prints, and make the process much more enjoyable. Whether you’re a beginner or looking to expand your toolkit, this list covers everything you need.
Linoleum Block – A linoleum block (or lino) is the surface you carve your design into. It’s made of linseed oil, wood flour, and a fabric backing like Hessian. My preference is grey lino backed with Hessian due to the detail it captures and its durability. For beginners, I recommend using softcut lino, which is easier to carve and more flexible.
Lino Cutting Tools – Lino cutting tools are used to carve designs into your block. They come with various blade shapes, like V-shaped and U-shaped gouges, for different textures. Over the years, I have used a range of cutting tools, but my preference is Pfeil cutting tools, due to the quality and precision they offer for detailed cuts. For beginners Essdee lino cutting tools are a great start for both budget and quality.
Lino Printing Ink – Lino printing inks are thick, highly pigmented inks designed for block printing. I swear by Cranfield Caligo Inks, which offer the richness of oil-based inks but can be washed with warm soapy water for easy clean-up. They’re perfect for both professional and home use.
Paper – Printmaking paper is essential for hand printing as it affects how the ink transfers from the block. I recommend lightweight paper between 60gsm and 160gsm, as heavier paper makes hand printing difficult. For beginners keep it simple by using some cartridge paper for a home printer, which works well for home printing and is easy to access.
Printmaking Brayer (ink roller) – A brayer is used to roll ink evenly onto your lino block. Personally, I use a Japanese printmaking brayer, but the Essdee red handle rollers are a great roller to start with due to their affordability and effectiveness for beginners.
Baren / Wooden Spoon – A baren is used to apply pressure to transfer your print from the inked lino to the paper. I use a glass Iron Frog Baren, which I ordered from the USA (worth every penny). However, a wooden spoon will work just as well when starting out, making it an affordable alternative.
Glass or Perspex Sheet – This is handy to roll ink onto before applying it to your block. I use a few old shelves from a fridge, as the reinforced glass is durable and provides a smooth surface for inking. Any flat glass or perspex sheet will do the job.
Hand Scraper / Palette Knife – A hand scraper or palette knife is useful for scooping ink out of the pot and working it before rolling. It ensures the ink is mixed to the right consistency before applying it to the block.
Pencil – A pencil is always handy for marking your lino block, planning out further edits, or moving an inked block without smudging your work. It’s a simple yet useful tool in the process.
Carbon Paper – Carbon paper helps transfer your design from paper to the lino block before cutting. I often use it to ensure accurate placement of my designs, though you can also draw directly onto the lino with a pencil or marker.
Most of the resources needed for the lino printing process are relatively inexpensive, here at Hickman Design we sell a range of printmaking equipment and beginner-friendly lino printing kits that include all the essential tools and materials for lino printing for beginners.
How to Make a Linocut – The Lino Printing Process Step by Step
The basic steps of how to do lino printing are designing your image, carving it into a linoleum block, and printing it onto paper using ink. Begin your linocut journey with our concise, step-by-step guides below. Featuring helpful infographics and video tutorials, our tutorials provide everything you need to start lino printing, whether you’re a beginner to linocut or an experienced printmaking artist.
1. Gather Linocut Materials
Start by collecting all the necessary materials for lino printing: linoleum block, cutting tools, ink, paper, brayer, baren, glass sheet, scraper, pencil, and carbon paper. If you’re unsure what materials are essential, check out our complete material guide for lino printing.
Next, let’s prepare your workspace to ensure everything is set up correctly.
2. Prepare Workspace – Setting up Studio and Workspace
With your materials ready, it’s time to ensure your workspace is clean, well-lit, and protected with a covering. For tips on setting up a professional workspace, refer to our guide one preparing your workspace or studio for linoleum printing.
Once your workspace is ready, it’s time to focus on your design.
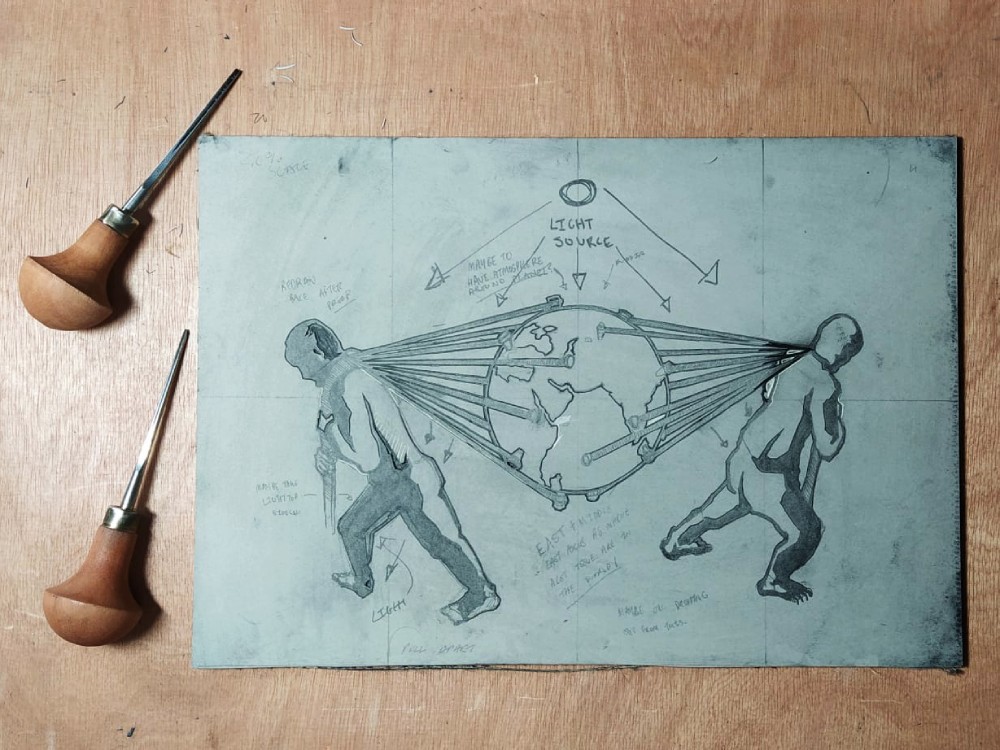
3. Design Your Linocut – Planning Your Linoleum Print
Now that your workspace is prepared, begin sketching your design on paper and transfer it to your linoleum block using carbon paper or draw straight onto your lino block. If you need help with creating your design, check out our guide to designing your lino print.
After you have your design ready, it’s time to transfer it onto the linoleum block.
4. Transferring Your Design onto the Linoleum
With your design complete, the next step is transferring it onto your linoleum block. Follow the steps in our guide on transferring your design onto your block of linoleum to ensure a smooth transfer and avoid errors.
Once your design is on the block, let’s move on to carving.
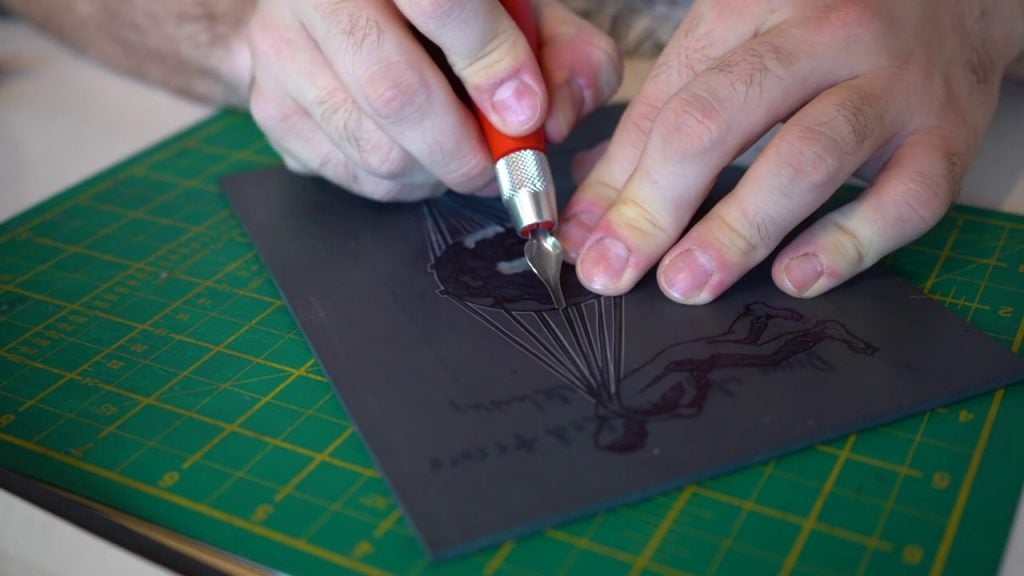
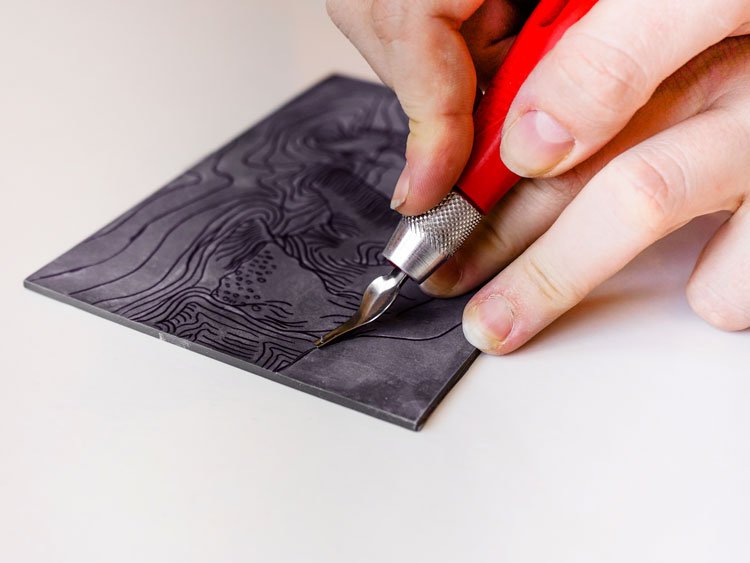
5. Carve Linoleum – How to Cut and Carve Lino Block
Using the proper lino cutting tools, carefully carve out your design on the linoleum block. Our how to carve your linoleum blocks guide offers detailed techniques for carving clean and accurate lines.
With the carving done, let’s get ready for inking.
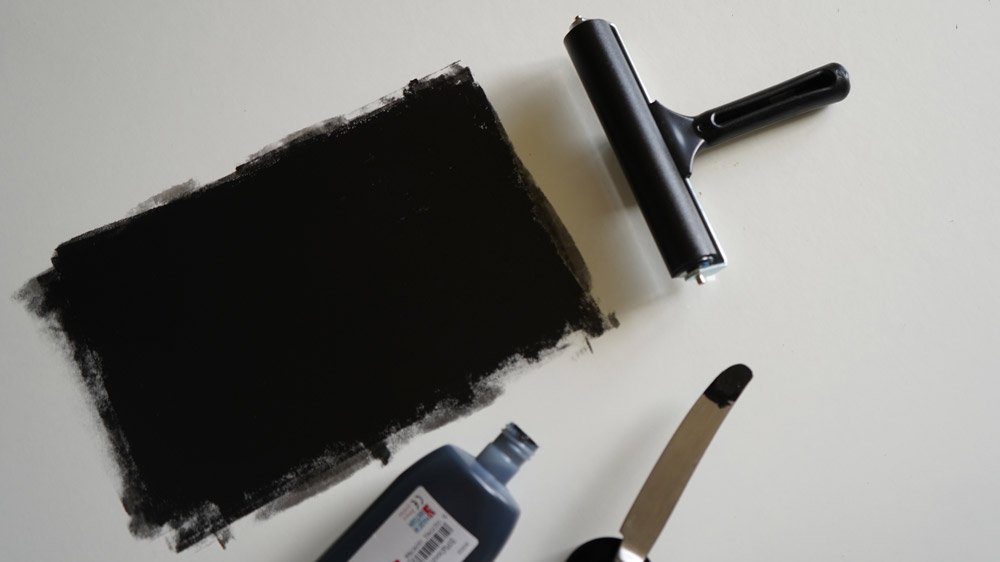
6. Ink the Lino Block – How to Ink Your Linoleum
After carving, it’s time to apply ink. Use a brayer to roll out a thin, even layer of ink across the raised surfaces of your linoleum block. For more detailed techniques on inking, read our guide on inking your block. If you’re interested in printing in multiple colours, explore our masking technique for multi-colour printing.
Once your block is inked, it’s time to print your design.
7. Print Design – Printing Your Linocut
Place the paper onto your inked linocut block and use a baren or the back of a spoon to apply even pressure. This will transfer the ink onto the paper, creating your print. For more details on this process, check out our guide on printing your linocut.
Once your print is done, let’s move on to drying and cleaning up.
8. Dry and Finish – Clean-Up After Lino Printing
Carefully lift the paper from the block and let it dry. While the print dries, it’s important to clean your tools and workspace properly. Follow our lino print cleaning guide to ensure everything is ready for future projects.
Having Lino Printing Problems?
If your prints are coming out smudged, faint, or marked where they shouldn’t be, don’t worry! Head over to our short Lino Printing Troubleshooting Guide for easy fixes to the most common issues. With a few adjustments, you’ll be back to pulling crisp, beautiful prints in no time.
Designing and cutting linocut
Lino Printing Resources
This section offers additional resources and detailed guides for further reading on lino printing. You’ll tutorials on lino printing equipment and techniques that assist you at every stage of your journey. From choosing the right lino printing tools and materials to mastering various carving and printing methods, our guides provide valuable information to enhance your skills. Whether you’re a beginner or looking to refine your techniques, these resources will support you in improving your craft.
Welcome to our guide on lino printing tools. Here, you…
Lino Printing FAQ Section
Below are answers to commonly asked questions about linocut, covering topics that go beyond basic troubleshooting.
Why is Linocut Criticised?
Short Answer: Linocut often receives criticism for its softer linoleum material (less durable, holds less detail) and a general perception that it’s a simpler, less sophisticated printmaking technique.
Detailed Explanation
Durability: Linoleum is inherently softer than wood, causing blocks to degrade with repeated use, especially for large editions.
Detail Limitations: Due to its pliability, linoleum doesn’t hold ultra-fine or intricate details as well as harder surfaces like wood or metal.
Simplistic Perception: Its accessible nature and shallower learning curve can lead some to dismiss linocut as “less refined” compared to etching or lithography.
Despite these criticisms, linocut is widely respected for its bold lines, tactile carving experience, and the creative possibilities it offers both beginners and experienced artists.
Is Lino Printing the Same as Block Printing?
Short Answer: No, but they are closely related. Lino printing is one form of block printing, both belonging to the relief printmaking family.
Detailed Explanation
Common Ground: In relief printing, ink is rolled onto raised surfaces of a carved block and transferred to paper or fabric.
Key Differences:
Materials: Lino printing uses linoleum, which is softer and easier to carve, while block printing can involve wood, rubber, or stone.
Carving: The smoothness of linoleum often suits more detailed designs, whereas wood’s grain can introduce a distinctive texture and rustic feel.
Despite the variations, both techniques share core methods and yield visually striking prints.
Lino Printing vs Woodblock Printing
Short Answer: Both are relief printmaking methods, but lino printing uses linoleum while woodblock printing uses wooden blocks. The result is typically smoother lines from lino and a grainy, more textured feel from wood.
Detailed Explanation
Material & Texture: Linoleum’s softness makes carving simpler, ideal for crisp lines and finer details. Wooden blocks, however, can contribute a natural grain texture to the final piece.
Ease of Use: Lino is often favoured by beginners or those seeking cleaner finishes, whereas woodblock printing may appeal to artists wanting a more traditional or rustic look.
Short Answer: You can achieve multi-colour lino prints either by using one block (reduction printing) or multiple blocks, each dedicated to a specific colour.
Detailed Explanation
Reduction Printing: Carve and print the first colour; then carve away more of the same block before printing the next colour, layering your design with each step.
Multiple Blocks: Each colour has its own block; the prints are layered using precise registration to align the final image.
Short Answer: Linocut is prized for its straightforward setup, budget-friendly materials, and creative versatility – perfect for home artists of all levels.
Detailed Explanation
Simplicity: Minimal equipment needed; you can carve and print right from a kitchen table.
Accessibility: Ideal for newcomers, as softer linoleum is easier to carve than wood.
Creative Freedom: Despite its perceived simplicity, linocut can deliver intricate designs and bold prints, offering a satisfying blend of technique and expression.
Can You Lino Print at Home?
Short Answer: Absolutely. All you need are basic carving tools, ink, a roller, linoleum blocks, and paper – making it one of the most beginner-friendly printmaking methods.
Detailed Explanation
Cost-Effective: Basic sets of tools and materials are affordable and widely available.
Project Range: From homemade Christmas cards to full-scale art prints, lino printing adapts to various creative goals.
Getting Started: Check out our step-by-step tutorial for beginners, or see our printmaking guide for more context.
Your Next Print Awaits: Final Thoughts and Next Steps
Congratulations on taking your first steps into the world of lino printing! By following these basic techniques and tips, you’re already well on your way to producing eye-catching linocuts from the comfort of your home. As you continue experimenting, remember that each carved block and proof print is a new learning opportunity. Don’t be afraid to explore different inks, papers, or even multi-colour methods as you build confidence.
If you run into any stumbling blocks, smudged edges, faint impressions, or stray marks – take a look at our Lino Printing Troubleshooting Guide for easy fixes. We also have more resources on advanced techniques if you’re eager to expand your repertoire. Most importantly, have fun, embrace the creative process, and watch your unique style unfold with every print you pull. Happy printing!
Last Updates Published: May 27, 2025
Luke Hickman
Author at Hickman Design
Luke Hickman is a printmaker and artist with over 15 years of experience, specialising in fine art printmaking methods such as lino printing, screen printing, and etching. He studied at Norwich University, graduating with a BA (Hons) Fine Art, and has worked in both the commercial printing and digital marketing industries for over 7 years. Luke’s work revolves around the idea of creating art that can illustrate a story, with topics covering war, politics, and history. His expertise in traditional printmaking techniques allows him to create unique, hand-crafted pieces that blend contemporary themes with time-honored processes. In addition to his artistic pursuits, Luke also writes about digital marketing and SEO at Bird Marketing, sharing his knowledge and experience to help businesses succeed online.
We use cookies to ensure that we give you the best experience on our website. If you continue to use this site we will assume that you are happy with it. Privacy policyOk